Tutorial
This tutorial will teach you the basics of building a wheezy.web application using your favorite text editor and python. We will use SQLite as database and python version 2.6+ or 3.2 (mainly for context manager and built-in JSON support). AJAX and JSON section of tutorial require jQuery.
Estimated completion time: 30-60 minutes.
Prerequisites
Before you start, make sure you’ve installed the prerequisites listed below.
Check python version:
$ python -V
Python 2.7.3
Create virtual environment:
$ virtualenv env
Install wheezy.web into virtual environment:
$ env/bin/easy_install wheezy.web
What You’ll Build
You will implement a simple guestbook application where users can see a list of greetings as well as add their own.
List of greetings:

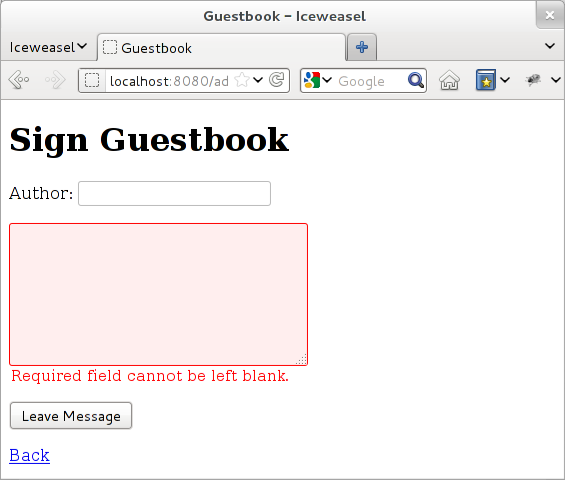
Sign guestbook:
For the purpose of this tutorial we store each of identified software actor in its own file so at the end you will get a project structure with well defined roles.
Domain Model
The domain model represents key concepts of entities within a scope of the application. Our primary entity is a greeting that visitor leave in guestbook, it can be characterized by the following: a time stamp when it was added (current time), an author and a message.
Let’s model what we figured so far (file models.py):
from datetime import datetime

class Greeting(object):

    def __init__(self, id=0, created_on=None, author='', message=''):
        self.id = id
        self.created_on = created_on or datetime.now()
        self.author = author
        self.message = message
Validation Rules
Two attributes author and message are entered by visitor so we need
apply some validation rules:
authorcan be left blank (for anonymous entries) but if it is entered it should not exceed 20 characters in length.messageis required and let take that anything meaningful can be expressed in a text between 5 to 512 characters.
So far so good, let’s define our application domain validation constraints
(file validation.py):
from wheezy.validation import Validator
from wheezy.validation.rules import length
from wheezy.validation.rules import required

greeting_validator = Validator({
    'author': [length(max=20)],
    'message': [required, length(min=5, max=512)],
})
For the complete list of validation rules available, please refer to wheezy.validation documentation.
Database
For the purpose of this tutorial we have selected SQLite database as
persistence layer so let define SQL schema for our domain (file
schema.sql):
CREATE TABLE greeting (
    id INTEGER PRIMARY KEY AUTOINCREMENT,
    created_on TIMESTAMP NOT NULL,
    author TEXT,
    message TEXT NOT NULL
);
Issue the following command from the terminal:
$ cat schema.sql | sqlite3 guestbook.db
This creates an SQLite database guestbook.db with table greeting.
Let’s try to add some data from the sqlite3 command prompt:
$ sqlite3 guestbook.db
SQLite version 3.7.16.2 2013-04-12 11:52:43
Enter ".help" for instructions
Enter SQL statements terminated with a ";"
sqlite> INSERT INTO greeting (created_on, author, message)
   ...> VALUES ('2012-03-01 13:50:27', 'John Smith', 'This looks cool!');
sqlite> SELECT * FROM greeting;
1|2012-03-01 13:50|John Smith|This looks cool!
sqlite> .quit
We will use these two basic SQL statements (SELECT and INSERT) in repository.
Configuration
Let add configuration file where we can store some settings (file
config.py):
import sqlite3

def session():
    return sqlite3.connect('guestbook.db',
                           detect_types=sqlite3.PARSE_DECLTYPES)
We have defined function session() that returns an object valid to
issue some database related operations including query for data,
transaction commit, etc. This object serves the unit of work purpose and is
suitable to be used with python context manager.
Repository
A Repository mediates between the domain and persistence layers (database, file, in-memory storage, etc.), it encapsulates operations performed and provides object-oriented view of the persistence layer.
Accordingly to the problem statement, we need two things here: a way to get a list of greetings and ability to add a greeting.
Since we have a database and a way to obtain database objects we can add
repository (file repository.py):
from models import Greeting

class Repository(object):

    def __init__(self, db):
        self.db = db

    def list_greetings(self):
        cursor = self.db.execute("""
                SELECT id, created_on, author, message
                FROM greeting
                ORDER BY id DESC
                LIMIT 10
        """)
        return [Greeting(
                id=row[0],
                created_on=row[1],
                author=row[2],
                message=row[3]) for row in cursor.fetchall()]

    def add_greeting(self, greeting):
        self.db.execute("""
                INSERT INTO greeting (created_on, author, message)
                VALUES (?, ?, ?)
        """, (greeting.created_on, greeting.author, greeting.message))
        return True
Let’s see how it works from python command prompt:
$ env/bin/python
Python 2.7.3 (default, Mar  5 2013, 01:19:40)
[GCC 4.7.2] on linux2
Type "help", "copyright", "credits" or "license" for more information.
>>> from config import session
>>> from repository import Repository
>>> db = session()
>>> repo = Repository(db)
>>> greetings = repo.list_greetings()
>>> greetings[0]
<models.Greeting object at 0xa023e4c>
>>> greetings[0].created_on
datetime.datetime(2012, 3, 1, 13, 50, 27)
>>> db.close()
>>> exit()
View
Handlers
Views contain handlers that respond to requests sent by a browser. We need two handlers: one for list and the other one to add a greeting.
List handler returns a list of greeting stored (file views.py):
from wheezy.web.handlers import BaseHandler
from config import session
from models import Greeting
from repository import Repository
from validation import greeting_validator

class ListHandler(BaseHandler):

    def get(self):
        with session() as db:
            repo = Repository(db)
            greetings = repo.list_greetings()
        return self.render_response('list.html',
                greetings=greetings)
We create a unit of work by applying function call to session and
add it to a scope of python operator with (which effectively closes
our unit of work when execution leaves this scope). session is closed
before we pass anything to template render.
Add handler store visitor greeting (file views.py):
class AddHandler(BaseHandler):

    def get(self, greeting=None):
        greeting = greeting or Greeting()
        return self.render_response('add.html', greeting=greeting)

    def post(self):
        greeting = Greeting()
        if (not self.try_update_model(greeting)
                or not self.validate(greeting, greeting_validator)):
            return self.get(greeting)
        with session() as db:
            repo = Repository(db)
            if not repo.add_greeting(greeting):
                self.error('Sorry, can not add your greeting.')
                return self.get(greeting)
            db.commit()
        return self.see_other_for('list')
The respond to browser request to add handler is simply render add.html
template with some defaults passed with greeting model. However when
visitor submits ‘add page’ we try update model greeting with HTML form
data. If it fails for any reason we display user error messages
(those returned by try_update_model()). If update model succeeds it
holds data entered by user that we can validate with greeting_validator.
Note BaseHandler keeps a dictionary of all errors reported in errors
attribute. Again if validation fails we redisplay add page with any
errors reported.
When input is considered valid per all possible checks we create a unit
of work from session and add it to with operator scope. Again, operation
in repository may fail so we check if fails we add a general error so
user can see it, otherwise we commit changes to unit of work and redirect
user to list handler.
Configuration
wheezy.web is agnostic to template render. However it integrates with jinja2, mako, tenjin and wheezy.template. For purpose of this tutorial wheezy.template has been selected:
$ env/bin/easy_install wheezy.template
Let add wheezy.template configuration (file config.py):
from wheezy.html.ext.template import WidgetExtension
from wheezy.html.utils import html_escape
from wheezy.template.engine import Engine
from wheezy.template.ext.core import CoreExtension
from wheezy.template.loader import FileLoader
from wheezy.web.templates import WheezyTemplate

options = {}

# Template Engine
searchpath = ['templates']
engine = Engine(
    loader=FileLoader(searchpath),
    extensions=[
        CoreExtension(),
        WidgetExtension(),
    ])
engine.global_vars.update({
    'h': html_escape
})
options.update({
    'render_template': WheezyTemplate(engine)
})
Above configuration says that templates can be found in templates
directory and we are using several extensions and helpers from wheezy.html.
Layout
Since templates usually have many things in common let’s define common layout used
by both pages we are going to create (create directory templates and
add file layout.html):
@require(path_for)
<html>
    <head>
        <title>Guestbook</title>
        <link href="@path_for('static', path='site.css')"
            type="text/css" rel="stylesheet" />
    </head>
    <body>
        <div id="main">
            @def content():
            @end
            @content()
        </div>
    </body>
</html>
You need to be explicit about any context variable used in
the template by specifying them in a @require directive.
Templates
Define template for list handler (in directory templates add file
list.html):
@extends("layout.html")

@def content():
@require(path_for, greetings)
<h1>Guestbook</h1>
<a href="@path_for('add')">Sign guestbook</a>
@for g in greetings:
<p>
    @g.id!s. On @g.created_on.strftime('%m/%d/%Y %I:%M %p'),
    <b>@str(g.author or 'anonymous')</b> wrote:
    <blockquote>@g.message.replace('\n', '<br/>')</blockquote>
</p>
@end
@end
What is interesting here is path_for() function that can build reverse
path for given route name. So when someone clicks on Sign guestbook
link the browser navigates to a url that lets add a greeting.
Define template for add handler (in directory templates add file
add.html):
@extends("layout.html")

@def content():
@require(greeting, path_for, errors)
<h1>Sign Guestbook</h1>
@greeting.error()
<form action="@path_for('add')" method='post'>
    <p>
        @greeting.author.label('Author:')
        @greeting.author.textbox()
        @greeting.author.error()
    </p>
    <p>
        @greeting.message.textarea()
        @greeting.message.error()
    </p>
    <p>
    <input type='submit' value='Leave Message'>
    </p>
</form>
<a href="@path_for('list')">Back</a>
Here you can see syntax provided by wheezy.html for HTML rendering: label,
textbox, error, etc. HTML widgets require context variable errors. Please
refer to the wheezy.html documentation.
Style
Let’s add some style (create directory static and add file site.css):
input[type="text"], textarea {
    border: 1px solid #BBB; border-radius: 3px; }
input.error, textarea.error {
    border: 1px solid #FF0000; background-color: #FFEEEE; }
span.error { color: #FF0000; display: block; font-size: 0.95em;
    background: transparent 0px 2px no-repeat; text-indent: 2px; }
span.error-message {
    display: block; padding: 25px 25px 25px 80px; margin: 0 0 15px 0;
    border: 1px solid #DFDFDF; color: #333333; font-size: 13px;
    line-height: 17px; float: none; font-weight: normal;
    width: auto; -moz-border-radius:5px 5px 5px 5px; }
span.error-message { border:1px solid #C44509;
    background: no-repeat scroll 2px 50% #fdcea4; }
URLs
URLs tell how browser requests maps to handlers that ultimately process them.
Let map the root path to list handler and add path to add handler
(file urls.py):
from wheezy.routing import url
from wheezy.web.handlers import file_handler
from views import AddHandler
from views import ListHandler

all_urls = [
    url('', ListHandler, name='list'),
    url('add', AddHandler, name='add'),
    url('static/{path:any}',
        file_handler(root='static/'),
        name='static')
]
Note each url mapping has a unique name, so it can be easily referenced by function that build reverse path for given name or perform request redirect.
Application
Let’s define an entry point for guestbook application that combines all
together (file app.py):
from wheezy.http import WSGIApplication
from wheezy.web.middleware import bootstrap_defaults
from wheezy.web.middleware import path_routing_middleware_factory

from config import options
from urls import all_urls


main = WSGIApplication([
    bootstrap_defaults(url_mapping=all_urls),
    path_routing_middleware_factory
], options)

if __name__ == '__main__':
    from wsgiref.handlers import BaseHandler
    from wsgiref.simple_server import make_server
    try:
        print('Visit http://localhost:8080/')
        BaseHandler.http_version = '1.1'
        make_server('', 8080, main).serve_forever()
    except KeyboardInterrupt:
        pass
    print('\nThanks!')
Try to run the application by issuing the following command:
$ env/bin/python app.py
Visit http://localhost:8080/ to see your site in a browser.
AJAX and JSON
AJAX and JSON significantly minimize HTTP traffic between web browser and server thus allow you save bandwidth and serve more clients.
In this tutorial we will display validation errors using AJAX + JSON and fallback to regular HTML rendering is case browser has JavaScript disabled for some reason.
Add changes to views.py:
class AddHandler(BaseHandler):

    ...

    def post(self):
        greeting = Greeting()
        if (not self.try_update_model(greeting)
                or not self.validate(greeting, greeting_validator)):
            if self.request.ajax:
                return self.json_response({'errors': self.errors})
            return self.get(greeting)
        ...
What we added here is check if the current request is AJAX request and if so we return JSON response with errors reported:
if self.request.ajax:
    return self.json_response({'errors': self.errors})
Now we need some JavaScript code to:
- submit HTML form via AJAX
- display errors
- correctly handle redirect response
Create a new file site.js and place it in static directory with the
following content (we will be using jQuery):
String.prototype.format = function() {
    var args = arguments;
    return this.replace(/\{\d+\}/g, function(capture) {
        return args[capture.match(/\d+/)];
    });
}

function JSONForm(data, form) {
    $(form).prev('span.error-message').remove();
    $('span.error', form).remove();
    $('.error', form).removeClass('error');
    $.each(data.errors, function(key, value) {
        if (key == '__ERROR__') {
            form.before('<span class="error-message">{0}</span>'.format(
                    value.pop()))
        }
        else {
            key = key.replace(/_/g, '-');
            $('label[for="{0}"]'.format(key), form).addClass('error')
            var field = $('#' + key, form);
            field.addClass('error');
            field.after('<span class="error">{0}</span>'.format(
                value.pop()));
        }
    });
}

function ajaxForm(selector, dataType) {
    if (!dataType) dataType = 'json'
    $(selector || 'input[type="submit"]').live('click', function(e) {
        submit = $(this);
        submit.attr('disabled', 'disabled');
        var form = submit.parents('form:first');
        var data = null;
        if (this.name) {
            data = form.serializeArray();
            data.push({name: this.name, value: ''});
            data = $.param(data);
        }
        else
            data = form.serialize();
        $.ajax({
            type: form.attr('method') || 'get',
            url: form.attr('action'),
            data: data,
            dataType: dataType,
            success: function(data, textStatus, jqXHR) {
                if (jqXHR.status == 207) {
                    window.location.replace(jqXHR.getResponseHeader('Location'));
                } else if (data.see_other) {
                    window.location.replace(data.see_other);
                } else if (dataType == 'json'){
                    submit.removeAttr('disabled');
                    JSONForm(data, form);
                }
            }
        });
        return false;
    });
}
Open layout.html and add link to jQuery library and site.js
somewhere within head HTML tag:
<head>
    ...
    <script type="text/javascript"
    src="http://ajax.googleapis.com/ajax/libs/jquery/1.7.1/jquery.min.js">
    </script>
    <script type="text/javascript"
    src="@path_for('static', path='site.js')">
    </script>
</head>
Add the following to add.html to create a javascript AJAX
form:
<script type="text/javascript">
    $(document).ready(function() {
        ajaxForm();
    })
</script>
Try to run the application by issuing the following command:
$ env/bin/python app.py
Visit http://localhost:8080/ to see your site in a browser (try both with JavaScript enabled and disabled).
Content Cache
Why would we be making a call to database every time the list of greetings is displayed to user? What if we can cache that page for some period of time and regenerate it only when someone added another greeting? Let’s implement this use case with the wheezy.caching package.
Open config.py and add import for MemoryCache and Cached:
from wheezy.caching.memory import MemoryCache
At the end of config.py add initialization logic for cache, cache factory
and configuration options for HTTP cache middleware:
cache = MemoryCache()

# HTTPCacheMiddleware
options.update({
    'http_cache': cache
})
Since we are going to use HTTP cache middleware we need to instruct the application
bootstrap process about the middleware we are going to use. Open file app.py
and import http_cache_middleware_factory:
from wheezy.http.middleware import http_cache_middleware_factory
To the list of WSGIApplication middleware, add a HTTP cache middleware
factory:
main = WSGIApplication([
    bootstrap_defaults(url_mapping=all_urls),
    http_cache_middleware_factory,
    path_routing_middleware_factory
], options)
Finally let’s apply cache profile to the ListHandler. Add a few imports
(views.py):
from datetime import timedelta

from wheezy.http import CacheProfile
from wheezy.web import handler_cache
Use the handler_cache decorator to apply cache profile to the handler response:
class ListHandler(BaseHandler):

    @handler_cache(CacheProfile('server', duration=timedelta(minutes=15)))
    def get(self):
        ...
The ListHandler response is cached by server for 15 minutes.
Try to run the application by issuing the following command:
$ env/bin/python app.py
Visit http://localhost:8080/ to see your site in a browser. Try to add a greeting, and notice that the list page is not updated (it is being cached by server). Next we will use cache dependency to invalidate content cache.
Take a look at wheezy.http for various options available for content caching.
Cache Dependency
Let’s add cache invalidation logic, so once user enters a new greeting it causes the list page to be refreshed.
In file config.py add import for Cached:
from wheezy.caching.patterns import Cached
Declare cached (right after the created cache instance):
cache = MemoryCache()
cached = Cached(cache, time=15 * 60)
Modify ListHandler so it is aware about the list cache dependency key:
class ListHandler(BaseHandler):

    @handler_cache(CacheProfile('server', duration=timedelta(minutes=15)))
    def get(self):
        ...
            greetings = repo.list_greetings()
        response = self.render_response('list.html',
                greetings=greetings)
        response.cache_dependency = ('d_list', )
        #response.cache_dependency.append('d_list')
        return response
Finally let’s add a trigger, that causes the invalidation to occur in cache. Import cached from config module:
from config import cached
Modify AddHandler so that, on successful commit, the content cache for
ListHandler response is invalidated:
class AddHandler(BaseHandler):
    ...
    def post(self):
        ...
            db.commit()
        cached.dependency.delete('d_list')
        return self.see_other_for('list')
Try to run the application by issuing the following command:
$ env/bin/python app.py
Visit http://localhost:8080/ to see your site in a browser. Try add a greeting and notice that list page is refreshed this time.
Take a look at wheezy.caching for various cache implementations including distributed cache support.
Cache Vary
AJAX + JSON, content caching and cache dependency are a great way to boost application performance. How about content compression? That is another great option to save traffic. What if we were able cache compressed response thus we will save on server CPU as well. Let implement this use case.
Transforms are used to manipulate handler response according to some algorithm. We will use this feature to compress response right before it enters content cache.
Add imports in file views.py:
from wheezy.http.transforms import gzip_transform
from wheezy.web.transforms import handler_transforms
Let’s apply compression to ListHandler:
class ListHandler(BaseHandler):

    @handler_cache(CacheProfile('server', duration=timedelta(minutes=15)))
    @handler_transforms(gzip_transform(compress_level=9, min_length=250))
    def get(self):
        ...
Notice handler_transforms() decorator
is after handler cache, this way it is able to compress response before it goes to
the cache.
At this point we have a single version of the cached page - compressed. What
about browsers that do not accept gzip content encoding? It would be good somehow
to distinguish between web requests that support compression and those that do not.
Fortunately browsers send an HTTP header Accept-Encoding that serves exactly
this purpose. All we need is instruct content cache to vary response
depending on value in Accept-Encoding HTTP header.
Instruct ListHandler cache profile to vary response by Accept-Encoding
HTTP request header:
class ListHandler(BaseHandler):

    @handler_cache(CacheProfile('server', duration=timedelta(minutes=15),
        vary_environ=['HTTP_ACCEPT_ENCODING']))
    @handler_transforms(gzip_transform(compress_level=9, min_length=250))
    def get(self):
        ...
Notice we added vary_environ and used WSGI environment variable
HTTP_ACCEPT_ENCODING to be included into cache key used by content cache.
We can apply more permissive content caching to AddHandler:
class AddHandler(BaseHandler):

    @handler_cache(CacheProfile('both', duration=timedelta(hours=1),
            vary_environ=['HTTP_ACCEPT_ENCODING'],
            http_vary=['Accept-Encoding']))
    @handler_transforms(gzip_transform(compress_level=9, min_length=500))
    def get(self, greeting=None):
        ...
Notice that for HTTP caching we added http_vary directive, so
intermediate proxies can properly serve cached content.
Try to run the application by issuing the following command:
$ env/bin/python app.py
Visit http://localhost:8080/ to see your site in a browser.
Take a look at wheezy.http for various options available for content caching.
Exercises
- Refactor views by moving the cache profiles definition to a separate file (e.g. profile.py)
- Refactor repository by enforcing contract with duck typing asserts. See post and example.
- Refactor repository by introducing caching repository implementation (use factory to provide repository, see caching.py and factory.py).
- Enhance content caching for list handler by utilizing HTTP ETag browser caching (see membership cache profile in profile.py).
- Improve templates with preprocessor (see examples for preprocessor and config.py).